Monday, August 30, 2010

Monday Morsel from Mom (8th Edition) - Thai Basil Chicken

As promised, I'm here to share the recipe for the OH SO YUMMY Thai Basil Chicken my mom made when I was home last week.

It's a very simple recipe with lots of flavor. The hardest (and most time consuming) part is cutting the chicken into tiny thin slices so that it will cook up quickly when you toss it in the pan.
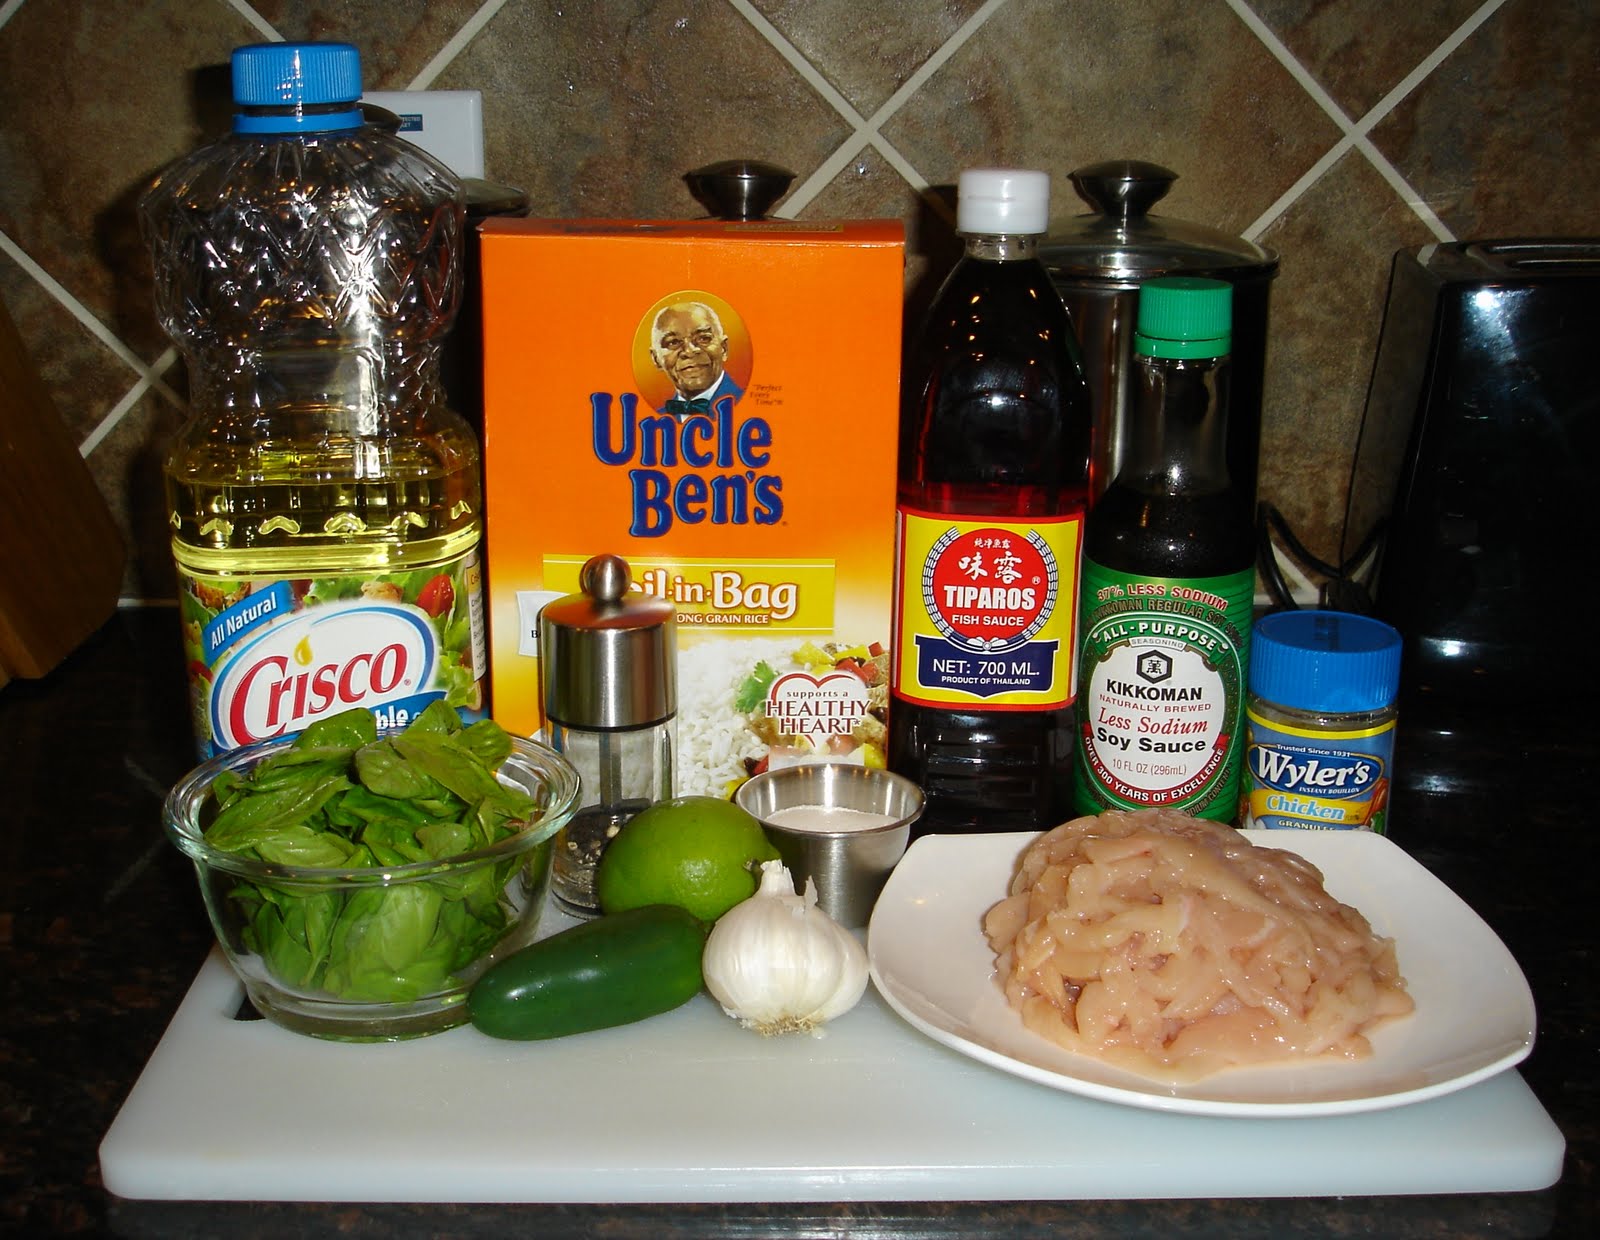
Ingredients:

* 1 lb boneless, skinless chicken breasts
* 1 T. oil
* 3 cloves garlic, minced or pressed
* 2 jalapenos or Serrano peppers, seeded & chopped
* 1/3 c chicken broth (or dissolve 1/2 t. granulated bouillon in 1/3 c water)
* 2 T. fish sauce
* 2 t. soy sauce
* 2 t. sugar
* 1/4 t. black pepper
* 1 to 1 1/2 cups fresh basil (can use mixture Asian & sweet- don’t chop)
* 1 lime cut in wedges
* White rice (preferably sticky rice)


Directions:

1. First, cut chicken lengthwise into very thin slices, like so...


Then take each slice.....


And cut lengthwise again into thin strips, like so...


And pile them up, like so...


2. Prepare rice according to package directions. Meanwhile, combine broth, soy sauce fish sauce, sugar and pepper in a small bowl and set aside.


3. Heat heavy skillet or wok until almost smoking. Add oil and stir fry chicken with garlic until chicken is opaque- about 3-4 minutes.


4. Add the peppers and stir fry another minute.


5. Pour sauce over the chicken; stir to combine.


6. Add basil and cook about 30 seconds- just long enough to wilt the leaves.


7. Serve with sticky rice and lime wedges to squeeze over the top.


My Tid-Bits:

* Freezing the chicken for about 30 minutes makes it easier to cut. Also, the chicken can be cut up in advance & stashed in the refrigerator until you are ready to use.

* I realize that some people have a severe aversion to raw meat, especially chicken. If that's you, I apologize because there's no real alternative to getting your hand covered in ooey gooey raw chicken. (That is unless you have friends over for dinner & when they ask "Can I do anything to help?", you say "Why, yes you can!" and have them to the slicing for you).

* I didn't use NEARLY the amount of basil that my mom did. We both grow our own herbs & apparently several of her basil plants were in need of some severe pruning because she came in with a HUGE amount of basil. Her "1.5 cups of basil" was probably more like 2.5 or 3 cups. We used ALL of it & boy was it yummy. So, use as much as you'd like. Just be sure it's AT LEAST 1 cup because it wilts down just like spinach.

.

Friday, August 27, 2010

Pouch Baked Fish with Pesto & Rice

I love when I have meetings that take me back to Central Texas (aka HOME!). Tuesday night I got to stay with my parents & mom made the most delicious Thai Basil Chicken for dinner. I will definitely be sharing the recipe for that one very soon.

However, today I'll just share with y'all what I made the night I got home from my business trip. I wanted to make something good for The Hubs to make up for the fact that his dinner while I was out of town didn't go as planned. (He was in the middle of grilling pork chops when the grill ran out of gas. I hate it when that happens. It messes everything up).

So, I opened the freezer & refrigerator (at the same time) and just stood in front of it hoping something delicious would magically appear. I spotted some frozen Mahi Mahi & some pesto and thought to myself, "I can make a dinner out of that" and this is what I ended up with...

Pouch Baked Fish with Pesto & Rice


Ingredients:

* 2 - 6 oz. Mahi Mahi fillets (or any white fish)
* 3 Tbsp. Reduced Fat Pesto
* 2 Tbsp. White Wine
* 1/2 tsp Salt
* 1/4 tsp Ground Black Pepper
* 1 lemon, sliced
* 1 package Uncle Ben's Sun-Dried Tomato Florentine Rice
* Foil


Directions:

1. Preheat oven to 425 degrees and prepare rice according to directions on the package.

2. Place each fillet on a large square of aluminum foil. Season both sides with salt & pepper.


3. Spread 1 tsp. pesto on each side of the fillets.


4. Top each fillet with 2 slices of lemon.


5. Turn up the edges of the foil & pour 1 Tbsp. white wine over each fillet.


6. Now fold the foil over the fish & roll up/crimp the edges to form pouches. Place on a baking sheet.


7. Bake at 425 for 20 minutes or until fish is cooked through & flaky. Caution: When you open the pouches, steam will come out. Don't burn your fingers!

8. Serve immediately by placing fish on a bed of rice and top with remaining pesto & a squirt of lemon juice.


My Tid-Bits:

* I'm on a healthy kick lately & I'm trying to keep things low calorie. This dish definitely fits into that category: 420 calories & 9g fat per serving. (One serving includes 1 fillet & 1 cup prepared rice).

* Before I could even sit down, The Hubs had almost cleaned his plate. His exact words: "This ones definitely a keeper. "

.

Monday, August 23, 2010

Tortilla Cups (with Cinnamon Apples)


The Hubs & I spent the weekend at our lake house in deep East Texas (more commonly referred to as The Piney Woods). Its in the middle of nowhere, on the most beautiful lake in all of Texas. When we pull into town, it seems like life slows down a bit. People ride around in golf carts & 4 wheelers while discussing the best fishing spots & latest town gossip. We've gotten to know the guy who sells us minnows & worms at the "Needmore Tackle Store" and the lady that owns "The Dam Liquor Store."

In that area your dining options include a place called "The Stump" (restaurant by day, bar by night), pizza from the Valero or BBQ being served out of a trailer by a woman wearing a bikini. (I kid you not...I couldn't make this stuff up if I tried. I won't even get into how good the people watching is in this area). Needless to say, we make most of our meals at the house (although Bikini Lady does make a good BBQ sandwich).

Last week, while thumbing through my magazines and trying to put together a list of what The Hubs and I would eat throughout the weekend, I came across a recipe for Tortilla Cups from Martha. Basically, you take a tortilla, press it down into a muffin cup, bake it until it's crisp and fill with whatever your heart desires. This weekend, I made my own variation (filled with cinnamon apples & Cool Whip) and they turned out so tasty!

Tortilla Cup Ingredients:

* 4 Flour Tortillas (6-inch)
* Butter or Margarine
* 1/4 Cup Sugar
* 1 Tbsp Cinnamon

Apple Filling Ingredients (for 4 Tortilla Cups) :

* 1 Large Apple
* 2 Tbsp Cinnamon Sugar Mixture, left over from above
* 1 Tbsp Butter
* Cool Whip

Directions:

1. Preheat the oven to 375 degrees.

2. Combine 1/4 cup sugar with 1 Tbsp. cinnamon & pour onto a plate.


3. Lightly butter both sides of a tortilla.


4. Press the tortilla into the cinnamon sugar. Flip & press the other side into the cinnamon sugar.


5. Repeat with remaining tortillas.

6. Lay the tortillas over a muffin tin (tortillas will overlap) and bake for 3 minutes, until tortillas are soft & pliable.


7. Remove from oven & gently press each tortilla into a muffin cup so that the sides fold up & form a cup. You may want to use a glass to help you press the tortillas into the cups.


8. Bake until tortillas are crisp and edges are golden, about 10 minutes. Remove from muffin cups immediately & set aside to cool.


9. Fill with desired topping. In this case, that would be cinnamon apples...

10. To make cinnamon apples, thinly slice your apples & toss with cinnamon sugar.


11. Melt butter in a saute pan & add the apples.


12. Cook, stirring often, until apples are tender & the sauce is bubbly.


13. To serve, place a dollop of Cool Whip in each Tortilla Cup, top with Cinnamon Apples and another dollop of whip cream!


My Tid-Bits:

* There are endless possibilities for filling the Tortilla Cups: ice cream, whip cream, yogurt, berries, peaches, chopped candies, nuts, etc.

* Leave the cinnamon sugar out of the recipe & make cups for mini taco salads, chicken salad, chili, appetizers, etc.

* You can vary your tortilla cup size by using smaller or larger muffin tins. Use a 3" round cookie cutter & mini muffin tin to make bite sized appetizers & desserts.

* These are perfect for a party because the cups can be made in advance. Store in an airtight container & fill when you are ready to serve them.

Enjoy!!

.

Friday, August 20, 2010

Grilled Chicken & Vegetable Tortellini


This is a Southern Living recipe that combines 2 things I love: Pesto & Tortellini.

I modified the original recipe to be smaller and a little more healthy (the original would have been enough to feed 6-8 people).

Note: In the pictures you'll see I used mushrooms. Don't do that. I had some in the refrigerator that needed to be used up so I tossed them in. Not so good.


Ingredients:
  • 1 medium zucchini, sliced
  • 1 boneless, skinless chicken breast
  • 2 tablespoons Light Italian dressing
  • 1 tablespoon freshly ground Italian herb seasoning
  • 2 teaspoons EVOO
  • 1/2 (19-oz.) package frozen cheese-filled tortellini
  • 1/2 (7-oz.) container refrigerated reduced-fat pesto
  • 2 medium tomatoes, seeded and chopped
  • Garnish: grated Parmesan cheese

Directions:

Preheat grill to medium heat.

1. Marinate chicken breast in a Ziploc bag with Italian dressing for at least 30 minutes. Remove & season with 1/2 Tbsp. Italian seasoning.

2. Toss zucchini with EVOO and season with 1/2 Tbsp. Italian Seasoning. Place in grill basket or thread onto skewers.

3. Grill zucchini and chicken at the same time, covered with grill lid. Grill zucchini 7 -10 minutes, stirring (or flipping) once. Grill chicken 5 to 6 minutes on each side or until done. Remove from grill; let stand 5 minutes.

4. Meanwhile, prepare half a package of tortellini according to package directions.

5. Coarsely chop chicken. Toss tortellini with half a container of pesto, tomatoes, chicken, and zucchini.

6. Garnish, if desired and serve immediately.


My Tid-Bits:

* Per Southern Living's recommendation, I used the McCormick Italian Herb Seasoning Grinder. Excellent choice! It can be found in the spice aisle with the salt & pepper grinders.

* You may notice I show two chicken breasts in the photo. I grilled both and used one for this meal and the other for fajitas the next night. I shredded the second chicken breast, tossed it in a pan with some bell peppers, onions & a splash of chicken broth and let it all cook down for my fajita filling. Delicious & easy.

* If you make the recipe as it is above, you'll have enough for 3 or 4 servings depending on what you serve on the side & how much your family eats.

* And here's the most surprising part (at least for me)...when I typed this recipe into my handy little nutritional calculator, it turns out that each serving (if this is a 3 serving recipe) has only 385 calories. It's a little high on the fat side with 20g, but that's what makes it tasty.

.

Wednesday, August 18, 2010

Fish Filets with Herbs, Zucchini & Couscous

Last week when my new Martha Stewart Living arrived in the mail, I skipped the first half of the magazine & went straight to the food section. Let's be honest, I like all of Martha's crafty decorating ideas, but I'll never take the time to do any of them.

Last night I made her "Fish Fillets With Herbs, Zucchini & Couscous" for dinner. You make a tasty herb paste, spread it on zucchini & fish and roast them. It was delicious and simple to make. As typical, I made a couple of changes (see My Tid-Bits).

Ingredients:

* 4 green onions, chopped
* 1 cup packed fresh cilantro
* 4 large mint leaves
* 3 Tbsp. extra-virgin olive oil
* 1 Tbsb grated fresh ginger (about 3/4" piece)
* coarse ground salt & pepper
* 1 zucchini, cut into spears or large pieces
* 2 (4 to 6 oz) skinless fillets of firm white fish (such as cod)
* 1 cup dry couscous
* lemon slices (optional)


Directions:

1. Preheat oven to 425 degrees.

2. In a food processor, combine green onions, cilantro, mint, ginger & salt.


Pulse until finely chopped...


Stream in 3 Tbsp. EVOO...


Season with salt & pepper...


3. Toss zucchini with 2 to 3 Tbsp herb paste. Place on baking sheet & roast for 5 minutes.


4. Rub remaining herb paste onto both sides of fish fillets.


5. Push zucchini to the side of baking sheet & arrange fish in center, leaving 1/2" between each fillet. Roast until fish are opaque and semi-firm to the touch, about 12 - 15 minutes.

6. Meanwhile, prepare couscous according to package directions.

7. Serve fish & zucchini over couscous. If desired, sprinkle with lemon juice.


My Tid-Bits:

* I loved this recipe because it had a ton of flavor & was easy to throw together. I made the herb paste before I left to go to the ballpark. When I got home, it took me a total of 20 minutes, including cook time to finish putting dinner on the table.

* My Changes:
a. The original recipe called for 4 fish fillets, but since it was just The Hubs & I, I just used 2.
b. Martha used 6 scallions, but I subbed the green onions I had in the refrigerator.
c. It also called for whole wheat couscous, but I just used regular.
d. The original also recommends (optional) 3/4 tsp. ground coriander. I just left that out.
e. I added the lemon juice & thought it added a nice touch!

* And to top of being easy & tasty - this recipe is healthy! If you make the recipe in its original form, each serving has 354 calories & 12 grams of fat.

* I will definitely be making the herb paste again. It would be great to toss with veggies before grilling or roasting.
.

Monday, August 16, 2010

Delicious Marshmallow Brownies

Last weekend, when our friends M&E were coming over for dinner, I wanted to make a dessert (because in my world, no meal is complete without something sweet at the end). I had a brownie mix that needed to be used up, but I didn't want to make plain brownies, so I perused my pantry for something to make them "special" and spotted some marshmallows. Have you ever had brownies with marshmallows? Their a great pair. Want to know what makes them even better? A rich, chocolate frosting. HEAVENLY!

Ingredients:

* 1 box of your favorite brownie mix
* 1/2 bag mini marshmallows
* 1/2 stick butter
* 1.5 Tbsp. cocoa powder
* 3 Tbsp. milk
* 2 cups powdered sugar
* splash of vanilla extract

Directions:

1. Prepare brownies according to directions on package.


2. Top with mini marshmallows...


And put back in the oven for 5 minutes until marshmallows are melted & puffy. Remove & let cool for 15 to 20 minutes.


3. To make icing, combine butter, cocoa powder & milk in a sauce pan over low heat.


4. Bring the mixture to a boil & then remove from heat.


5. Slowly stir in powdered sugar until mixture is smooth.


6. Stir in a splash of vanilla.


7. Drizzle icing over the marshmallows. Let sit for 30 minutes to allow icing to set.


8. Enjoy!

My Tid-Bits:

* A lot of people call these Mississippi Mud brownies. I call them TASTY GOODNESS!

* Always use a plastic knife to cut brownies. I don't know why, but a plastic knife makes a cleaner cut.

* I made these on Sunday thinking we'd have them for dessert that evening & then have plenty of leftovers for when our nephews arrived on Tuesday. By the time they arrived, the pan looked like this:
I don't know what it is about brownies, but I can't pass by the pan without cutting off a small piece. I guess those small pieces add up. Oops!!

.