Friday, February 26, 2010

English Muffin Brulee

A few weeks ago, The Hubs and I took a weekend trip to the Alamo City. We actually make that trip quite frequently because so many of our close friends live there and we just love SA. This particular weekend, we stayed with my college roommate, A. I see A fairly often, but since I hadn't seen her parents (who are hilarious & so kind) in quite some time, I suggested we meet them for breakfast one day.

On Sunday morning, we meet A's parents at one of their favorite breakfast spots, Le Peep. I had never been to Le Peep before and as I browsed the menu, I was overwhelmed at the number of breakfast options. I finally narrowed it down to 2 things:

1. Gooey Buns™ - An English muffin broiled with brown sugar, cinnamon and almonds.

Or

2. A full meal of pancakes, bacon, eggs, etc.

Option 1 sounded oh so delicious, but I was SUPER hungry, so I went with Option 2, convincing myself that I could totally make Option 1 at home for myself. So the following week, I did just that. And although they didn't sound too complex to make, I was curious to see if I could find the recipe (or a copy cat) online. So I did what I do with everything....I Googled it.

Y'all, whatever you do...DO NOT GOOGLE GOOEY BUNS!!! OH MY! I won't even begin to tell you what type of websites came up in the results, but you can guess. I immediately freaked out because I was on my work computer. No telling what my IT guy would think if he looked at my internet history and saw that. Eesh!!

So I promptly renamed my version English Muffin Brulee. Enjoy!

Ingredients:

* English Muffins
* Brown Sugar
* Spreadable Butter or Margarine
* Cinnamon
* Sliced Roasted Almonds (optional)


Directions:

1. Set the broiler on the oven to high.

2. Split you English muffins & spread both halves with butter.

3. Sprinkle generously with cinnamon.


4. Top with a layer of brown sugar. It should be at least 1/8" thick.


5. Place your English muffins on a pan & put into the oven under the broiler.

6. Your English Muffin Brulee is done with the brown sugar on top is melted, golden brown & bubbly. Be sure to watch them closely while under the broiler. This process happens quickly & you don't want them to burn.


7. Top with sliced roasted almonds.


My Tid-Bits

* For the sliced roasted almonds, I bought sliced almonds at the grocery, spread them out on a baking sheet & baked at 325 for 5-7 minutes.

* If you are like me and like your English muffins crispy, pop them in the toaster before spreading on the butter.

* In the picture you may notice I put mine on a rack, then on a pan. I did this do get the bottoms a little more crisp. Just personal preference.

* I've never actually had Le Peep's version, so I can't say they taste the exact same, but I can promise they are tasty!

Thursday, February 25, 2010

Shrimp-and-Squash Penne Pasta


You guys are going to start to think that The Hubs & I eat only seafood. That's really not the case. We eat lots of chicken & red meat, too. I just seem to find share-worthy seafood recipes more often.

I found this Shrimp-and Squash Penne Pasta recipe in Cooking Light. I love it because it's fast & REALLY easy.

I'm going to share with you all the original recipe, but please note in "My Tid-Bits" the adjustments I make when cooking for only 2 people.


Ingredients:

* 2 tablespoons olive oil
* 4 cups thinly sliced yellow squash (about 4 small)
* 3 cups thinly sliced zucchini (about 2)
* 1 pound medium shrimp, peeled and deveined
* 1/4 cup fresh lemon juice
* 1 teaspoon dried basil
* 1 teaspoon dried oregano
* 1/2 teaspoon salt
* 1/4 teaspoon black pepper
* 3 garlic cloves, minced
* 4 cups hot cooked penne (about 1/2 pound uncooked tube-shaped pasta)
* 1/2 cup thinly sliced fresh chives or green onions
* 1/4 cup (1 ounce) grated fresh Parmesan cheese


Directions:

1. Heat oil in a large nonstick skillet over medium-high heat.

2. Add squash and zucchini, and sauté 10 minutes.


3. Add shrimp; sauté 3 minutes.


4. Add juice and next 5 ingredients (juice through garlic); cook 2 minutes or until shrimp are done.


5. Combine shrimp mixture, pasta, chives, and cheese in a large bowl; toss gently.


My Tid-Bits

* If you make this recipe exactly as above, you're going to have A LOT of food! Typically when I make this for just The Hubs & I, I make the following adjustments:
1. Use 1 medium zucchini and 1 medium squash
2. Decrease shrimp to 1/2 lb.
3. Cut back on the pasta by 1/3 to 1/2
4. Use a tiny bit less basil & oregano - maybe 3/4 tsp.
5. Leave everything else the same

* If you saute your squash & zucchini for 10 minutes, it might be too mushy. Keep an eye on it & saute according to your taste. Remember it will cook a bit more while the shrimp are cooking.

* If you want to make it a bit more healthy, decrease the pasta & increase the veggies & shrimp OR serve over rice.

* If you follow the original recipe, this dish makes 5 LARGE servings with 350 calories each.

Tuesday, February 23, 2010

Shrimp Creole


As I sit here with my fingers crossed that H-town will see at least a flurry of snow, I'm wishing I had bought ingredients for some type of soup while at the grocery store yesterday. On cold days like today, nothing is better than a big pot of hot soup. One of the soups I make quite often is The Neely's Shrimp Creole. The Hubs loves this one.

The ingredient list is a bit long, but its nothing exceptionally unusual. I make a few tweaks from the original recipe. So, if you want the recipe in its original form, you can check it out here.

Ingredients:

* 2 Tablespoons olive oil
* 4 garlic gloves, minced
* 2 medium sized onions, chopped
* 3 stalk celery, chopped
* 1 or 2 green bell peppers, chopped
* 1 teaspoon cayenne pepper
* 2 cups seafood or shrimp stock (if you can't find - chicken stock is okay)
* 1 (28 oz.) can diced tomatoes
* 1 can tomato puree
* 1/2 teaspoon Worcestershire sauce
* 1/2 teaspoon hot sauce (like Louisiana Hot Sauce)
* 2 bay leaves
* Salt
* Pepper
* 1 1/2 - 2 lbs. large shrimp, peeled and deveined
* green onions, chopped (optional)
* Steamed Rice

Directions:

1. Heat a large pot over medium heat. Add olive oil.

2. Saute garlic, celery, onion and bell peppers. Cook until softened, about 5 minutes.


3. Stir in cayenne pepper and cook another 5 minutes.

4. Add seafood stock, tomatoes, tomato puree, Worcestershire sauce, hot sauce and bay leaves. Season with salt & pepper.


5. Simmer for 35 minutes, stirring occasionally.


6. Add shrimp and cook about 4 minutes until shrimp are cooked through.

7. Serve over rice and garnish with green onions.


My Tid-Bits:

* CAUTION: If you use the full amount of cayenne pepper & hot sauce, this dish is SPICY! I usually use half the amount of each & let The Hubs add more to his own bowl if he wants it more spicy.

* Seafood Stock - You have 2 options. You can find the type I used (photo above) in the refrigerated seafood section. At HEB it is by the crab meat, fish, etc. You can also buy shrimp bouillon cubes in the ethnic section.

* This recipe makes a BIG pot of Creole. If you're cooking for 2 people, like myself, you can easily freeze half. Before you add the shrimp, ladle the portion you want to freeze into a plastic container. Cover with plastic wrap, put the lid on & freeze. When you are ready to use the frozen portion, reheat it in a skillet & add the appropriate amount of shrimp.


* Sausage or chicken can also be added as enhancements.

P.S. I had planned to make one of my favorite shrimp & pasta dishes tonight to share with you all tomorrow, but The Hubs just came home and said he wanted to go out to eat. Who am I to argue? Maybe it will snow on us while we're out & about.

.

Monday, February 22, 2010

Monday Morsel from Mom (3rd Edition)

Caramel Apple Dip
Updated: October 2, 2010

When my dear friend, B got married in Oct. of 2008, my mom offered to provide a "light lunch" for B & her bridesmaids on the day of the wedding. Now, if you know my mom, she doesn't really do "light." When my mom offers to do a lunch, shower, reception, etc., she goes all out and you don't usually get your run-of-the-mill spread. She always comes up with the most delicious & unique food - specifically tailored to the guest of honors tastes.

The spread for B & her bridesmaids looked like this...


And this...


And this...


And this...


And this...


And this...


The picture above is of my mom's Caramel Apple Dip. It is OH SO HEAVENLY and was a HUGE hit with all of the girls. B even emailed me after she returned from her honeymoon asking for the recipe. It is super easy to make!

Ingredients:

* 2 8-ounce packages cream cheese
* 1/2 to 2/3 cup light brown sugar
* 2 10-ounce package almond toffee bits, Heath bits, or brickle
* Sliced apples, grapes, pineapple...


Directions:

1. Let cream cheese come to room temperature for easy mixing.

2. Beat cream cheese and brown sugar together. Stir in 1 cup toffee bits.


4. Spread in shallow serving dish. Sprinkle with additional toffee bits just before serving.


My Tid-Bits:

* You won't use the entire second package of toffee bits. Save them to pour over ice cream.

* Warning: Don't eat this alone. You'll end up consuming it all!

Friday, February 12, 2010

For My Valentine

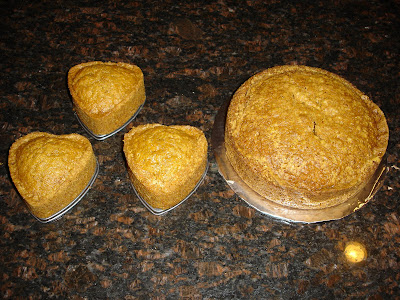
Every Valentine's Day, I make a heart shaped dessert for our Valentine's dinner at home. This year, I made The Hubs favorite, Carrot Cake with Cream Cheese Frosting!


You all know that I'm a firm believer in "If the box mix is just as good, no need to make it from scratch." Well, carrot cake is one of those you just can't make from a box mix. So here is my (ahem, my mom's) recipe.

Carrot Cake

Ingredients:

* 2 cups sugar
* 1 1/3 cups oil
* 3 eggs
* 3/4 tsp. salt
* 1 1/2 tsp. baking soda
* 2 tsp. cinnamon
* 2 tsp. vanilla
* 2 1/2 cups flour
* 2 1/2 cups grated carrots


Directions:

1. Grate carrots. Tip: 2 1/2 cups is about a 1 lb. bag.


2. Using an electric mixer, combine sugar, oil, eggs, salt, soda, cinnamon & vanilla.

3. Slowly mix in flour a little at a time.

4. Add carrots & stir until just combined.


5. Grease pans with butter & then coat with flour OR use my new favorite, Bakers Joy.


6. Pour batter into pans, filling only 2/3 of the way full.


7. Bake at 355 degrees. Baking time will vary depending on the type of pan you use. Bundt pans take about 1 hr. My hearts took about 35-40 minutes. The cake is done when it springs back when touched or a toothpick inserted in the middle comes out with only moist crumbs on it. Check your cake every so often to make sure it doesn't get over done. Don't worry about how the cake looks. It's going to get covered with frosting anyway.


8. Remove the cake from the oven & cool in the pan for 10 - 15 minutes. Remove cake from pan and let the cake cool completely on a wire rack.

9. Frost with Cream Cheese Frosting.


Cream Cheese Frosting


Ingredients:

* 1 - 8oz. package cream cheese
* 1/4 cup margarine, softened
* 1 1/2 tsp. vanilla
* 1 box powdered sugar


Directions:

1. Using an electric mixer, combine the cream cheese & margarine.
2. Add the powdered sugar 1 cup at a time (so it doesn't fly everywhere).
3. Add vanilla. Beat on high until fluffy.


How To Frost The Cake


I'll be really honest with you...I'm not that great at frosting cakes. There is probably a much better way to do it, but I start by putting a large blob of frosting on the top of the take. Then I use an icing (or offset) spatula to spread the frosting around the top & down the sides.


My Tid-Bits:

* Please note: Since this cake has a cream cheese frosting, it is best that you store it in the refrigerator.

* This is a very versatile cake when it comes to shape. You can do a bundt pan, 13x9 pan, two 8 or 9" rounds, etc. I made 3 small hearts using spring form pans. I poured the left over batter into a 9" round to make a cake to be frozen & eaten later.

* You may notice in the pictures that I left the hearts on the spring form pan bottoms and put a piece of cardboard covered foil under the round. I did that to make frosting them easier. Typically, I would put the cake on my cake stand & frost it there, but since the round is going in the freezer & the hearts will be traveling in a car, I put them on something more portable.

* To freeze your cake: Once the cake is frosted, put it in the freezer (uncovered) for 1 hr. Remove the cake from the freezer, wrap the cake in 2 layers of plastic wrap, then 1 layer of aluminum foil. Return to freezer. When you are ready to eat your cake, simply put it in the refrigerator overnight to defrost.

* Sprinkles are good for covering up mediocre frosting skills.


HAPPY VALENTINE'S DAY!!

P.S. Baking Cakes + Making Shrimp Creole + Making Crab Stuffed Mushrooms all at one time = MESSY KITCHEN.


I'd tell you that my kitchen doesn't end up looking like this often, but The Hubs would tell you I was lying.

Valentine's Treats

First of all, I apologize for the lack of blogging this week. It's been a busy one. However, last night I had a busy night in the kitchen making Crab Stuffed Portobello Mushrooms, Shrimp Creole & a special Valentine's Treat for The Hubs.

Eventually I'll get around to sharing all of those recipes, but since Valentine's Day is just 2 days away, I figured I better blog about that first.

I'll admit I don't really buy into the whole "Valentine's Day is a special day of love" thing. I don't expect The Hubs to get me anything special. Typically we exchange cards & have a nice dinner at home. But what I do LOVE about Valentine's Day is all of the yummy & creative treats I see in magazines & online. I thought I would share a few of my favorites.


Panera Bread Iced Valentine's Cookies


I realize these may not look that special, but if you went to Jefferson Elementary school (or perhaps any elementary school in Temple), one bite of these cookies will take you back in time to the cafeteria lunch line. Before I even entered Kindergarten at Jefferson, I was familiar with the "pink frosted cookies" available in the lunch line. They were OH SO YUMMY (and only 10 cents - my how things change). These Panera Bread cookies aren't exactly the same, but they are pretty close. And they'll have to make do since I don't think schools even sell cookies in the lunch line anymore. (Soap Box: Video games are leading to childhood obesity, not lunch line cookies).

Heart Cake


I saw this seriously amazing heart cake on another blog. Impressive! If I ever have 3 free days to work on it, perhaps I'll give it a go myself.

Homemade Fortune Cookies


These cute fortune cookies were featured on another blog, as well. You can fill them with hand written messages for that special someone or your friends.


Heart Topped Brownie Cupcakes


Martha Stewart made these festive cupcakes. You can find the recipe here; however, you can always cheat & use boxed mixes instead. Your cupcakes will still look really cute.

Heart Shaped Pancakes


This year, The Hubs & I will be starting off our Valentine's Day with heart shaped pancakes for breakfast. They are very simple to make. All you need is some pancake batter & molds like these:


You can get them several places, including Amazon or World Market (this is where I purchased mine for around $3). My only tip is to spray the molds with Pam between each pancake.

Hopefully I'll get around to posting more about the Valentine's treat I'm making for The Hubs later on today. It involves this...

Friday, February 5, 2010

Fabulous Foods Website Spotlight


I've decided from time to time that I will share with y'all some of my favorite food stores & websites. There are so many!!

Every year, I look forward to the Nutcracker Market here in Houston. Now if you're asking, "What's the Nutcracker Market?" you are SERIOUSLY missing out. It is a HUGE Christmas marketplace put on my The Houston Ballet the 2nd weekend of November every year. Reliant Center is filled with rows & rows of booths with people selling everything - food, clothes, jewelry, crafts, Christmas & home decor, etc. It is every girl's shopping dream come true.

A few years back, my mom joined me in an adventurous day of shopping at the Nutcracker Market. It was that day that we discovered what has become on of our favorite places to shop for gifts online: Cherry Republic.

Based in Glen Arbor, Michigan, this blurb from their website describes them best:

Welcome to Cherry Republic, North America's 4th largest country and the land of Life, Liberty, Beaches & Pie. Across our borders you will discover over 175 Cherry products on sale! Founded on our joy of life with cherries, our mission is to pass on to you the many ways to have fun with cherries! From our famous dried cherries, chocolate covered cherries, jams or cherry salsa we have great gifts or pantry fillers for you.


They have everything you can imagine made with cherries. A few of my favorites include:

Cherry Salsa
- It is a perfect blend of sweet & spicy with a unique flavor. It is great served with tortilla chips or poured over cream cheese & served with crackers.


Rain Orchard Crunch
- This is a mix of caramel corn, dried cherries, almonds & pecans. I may or may not have eaten an entire can in one day.


Cherry Ambassador Mix
- Dried cherries & cranberries mixed with pistachios & macadamia nuts.


White Chocolate Boomchunkas
- These cookies are DELICIOUS! They have dried cherries, rolled oats & chunks of white chocolate. CR also has chocolate, dark chocolate, coconut & chocolate pecan Boomchunka cookies, but the white chocolate are my favorite.


They also have tons of great gift boxes (or you can create your own). I often order these as Thank You, Birthday, Mother's Day & Valentine's Day gifts.

And to top it all off, they package up your selections in a cute box filled with crinkle paper and decorated with a pine cone, birch bark & cedar. They also offer flat rate shipping (which is usually great unless you only need to order 1 item). Right now they are even offering $5 flat rate shipping for Valentine's Day.

I highly recommend you visit their site the next time you need to order a gift for a friend (or just want to buy yourself a treat). Or come with me to the Nutcracker Market next year - Nov. 11 - 14, 2010. I'm sure they will be there again next year.

P.S. Unlike many other blogs, I was in NO WAY compensated for this post. I just truly LOVE this place & wanted to share it with my friends.

Tuesday, February 2, 2010

Easy Taco Soup

My Easy Taco Soup recipe is one created out of necessity. And its never the exact same. This is something I make when I don't have time (or am too lazy) to make a trip to the grocery store and The Hubs doesn't want to go out to eat. I typically have all of the necessary ingredients in my pantry & refrigerator. But if I don't, I improvise (hence why I said its never the exact same).

Ingredients

* 1 lb Lean Ground Beef
* 15 oz can Beans Black
* 1 packet Taco Seasoning
* 1 packet Hidden Valley Ranch Dip Mix
* 1/2 medium onion, diced
* 10 oz can Ro-tel
* 8.75 oz. can Whole Kernel Corn
* 14 1/2 oz can Diced Tomatoes
* 1 cup frozen or 1 can Green Beans
* 1/2 cup Cilantro, chopped
* 1 cup Beer
* 1/2 cup Monterey Jack Cheese
* 1 lime, sliced


Directions

1. In a dutch oven, brown ground beef with chopped onion. Drain & return to pot.


2. Add remaining ingredients to dutch oven, except for green beans, cilantro, cheese & lime.


3. Bring to a boil, reduce heat & simmer for 20 minutes. Stir in green beans. Simmer for another 10-15 minutes.


4. Serve in soup bowls & top with cheese, cilantro & a squeeze of lime.


My Tid-Bits:

* You can use this recipe as a guideline & add/change ingredients according to what you have in your pantry. Ex. Use kidney beans instead of black beans.

* The Rotel makes this soup a little spicy. If you're making it for kiddos, you may want to use the mild Rotel or just sub in a 2nd can of diced tomatoes.

* You probably wondering why on earth I would put beer in taco soup. It adds a good flavor. Trust me. Just don't use some fruity-off-the-wall beer. I've used Shiner, Coors Light & Tecate and all are good. Oh, and since this recipe doesn't use a whole can, I always give the leftovers to The Hubs to drink.

* I usually serve this soup with tortilla chips or corn bread. And it is VERY good (almost better) the next day.

* This recipe makes 6 large bowlfuls, with about 365 calories each.