I LOVE to bake & will use any excuse to whip up something delightful. This weekend I had the perfect excuse: Our friends C&B came in to stay with us and go to NCAA Tournament (YEAH DUKE!) AND we also invited our new friends M&E over for some basketball watching & Wii playing (which eventually led to a late night trip to the REAL bowling alley - SO FUN)! I thought this would be the perfect time to try out a new recipe I had recently seen in Southern Living.
These Sour Cream Pound Cake Cupcakes look delicious in the magazine, so I thought I'd give them a try.
They did not disappoint! They were very easy to make & tasted OH SO GOOD!
Note: In the magazine & online they have several different versions of this cupcake, but I played it safe and went with the original thinking everyone would like them best.
Ingredients:
* 1/2 cup butter, softened
* 1/2 (8-oz.) package cream cheese, softened
* 2 cups sugar
* 4 large eggs
* 1 teaspoon vanilla extract
* 3 cups all-purpose flour
* 1 teaspoon baking powder
* 1/2 teaspoon baking soda
* 1/2 teaspoon salt
* 1 (8-oz.) container sour cream
* Desired Frosting
Directions:
1. Preheat oven to 350°.
2. Beat butter and cream cheese at medium speed with an electric mixer until creamy. Beat in sugar until light and fluffy.
3. Add eggs, 1 at a time, beating until blended after each addition.
4. Stir in vanilla.
5. In a separate bowl, combine flour and next 3 ingredients.
6. Gradually add flour mixutre to butter mixture alternately with sour cream, beating until blended. Add in this order: 1 cup flour mixture, 1/2 of the sour cream, 1 cup flour mixture, remaining sour cream, remaining flour mixture.
7. Spray your mini muffin pan with Bakers Joy or use muffin liners.
8. Spoon batter by rounded tablespoonfuls into lightly greased miniature muffin pans.
9. Bake at 350° for 13 to 15 minutes or until a wooden pick inserted in centers comes out clean. Cool in pans on wire racks 5 minutes. Remove from pans to wire racks, and cool completely (about 30 minutes). Makes 6 dozen mini cupcakes.
10. Top cupcakes with your favorite frosting. I used Southern Living's Vanilla Buttercream .
Note: To prepare regular-size cupcakes, spoon batter into 2 lightly greased or lined 12-cup muffin pans, filling two-thirds full. Bake at 350ยบ for 22 to 24 minutes or until a wooden pick inserted in centers comes out clean. Cool and decorate as desired. Makes 2 dozen.
My Tid-Bits:
* These were good. Almost too good. I couldn't stop eating them, which is not good considering its about to be summer and all.
* However, I will definitely be trying some of the variations on this cupcake. The Salted Caramel Chocolate ones sound yummy!
* As you can see, I chose to make both mini cupcakes & regular sized. This was perfect for our guests. Some wanted the WHOLE cupcake and some just wanted a bite (and some had BOTH, but I'm not naming any names). This recipe made 2 dozen minis and 1 dozen regulars.
* These pound cake cupcakes would also be great for personal strawberry shortcakes. Just top with whip cream & berries!
.
I love to cook! Along my journey to finding fabulous food I have come across many great recipes. They come from many sources: magazines, TV, online, my talented momma & what I like to call "kitchen experiments". I'm a firm believer that good food is to be shared. So here I'll share with you all my journey to fabulous food. Enjoy!
Monday, March 29, 2010
Tuesday, March 23, 2010
Orzo Pasta Salad
Ever since I made Rachel Ray's Toasted Orzo Chicken Soup (see here), I've been wanting the use the other 1/2 bag of orzo pasta I had left. I Googled some recipes, but couldn't find one that was just what I wanted, so I went with what I thought sounded good and it turned out...GREAT! I love successful kitchen experiments!
This Orzo Pasta Salad makes a great, refreshing side dish. I can be served hot or cold. Both are good.
I apologize in advance for the poor job on pictures. I was in a hurry to get dinner on the table.
Ingredients:
* 1 cup dry orzo pasta
* 1 medium zucchini, sliced
* 1/2 large red onion, diced
* 8 - 10 cherry tomatoes, halved
* 1/2 jar of roasted red peppers, diced
* 1 large carrot, shredded
* 1/2 cup flat leaf parsley, chopped
* 3-4 large basil leaves, chopped
* 1/4 cup lemon juice
* olive oil
* salt
* pepper
Directions:
1. Bring 4 quarts salted water to a boil. Add 1 cup orzo pasta. Cook 8-9 minutes or according to directions on package.
2. Meanwhile, add 1 Tbs. olive oil to a pan over medium heat. Add onion & zucchini and saute until tender.
3. When pasta is done, drain well.
4. Toss pasta with sauteed zucchini & onion, parsley, basil, red peppers, carrot & tomatoes.
5. Whisk together lemon juice, 3 Tbs. olive oil, salt & pepper (to taste).
6. Pour dressing over pasta & toss to coat.
My Tid-Bits:
* I was really excited at how well this turned out the first time around. The Hubs really liked it,too!
* This would be great for a luncheon or shower! Serve chilled & top with some Feta.
* Makes 6 good sized servings with 250 calories each.
* If you need a quick weeknight meal, combine this pasta with one of these chickens & you have a fast, easy dinner!
.
Sunday, March 21, 2010
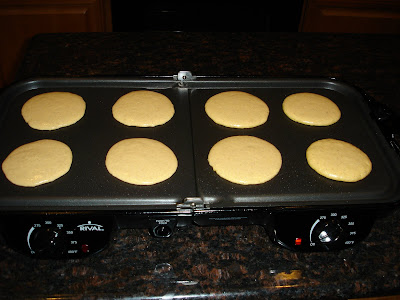
Pumpkin Pancakes
Every year when September 1st rolls around, I go into full Fall mode (even though it's still hotter than Hades here in Houston). I pull out my Fall decorations, purchase mini gourds at the store to put on my coffee table and pull out all of our Aggie football gear.
I also start making all kinds of Fall goodies in the kitchen. Recipes involving apples or pumpkins are always at the top of my list. A couple of years ago, I came across a WONDERFUL Pumpkin Pancake recipe from Martha Stewart.
The Hubs & I like them so much, they are no longer reserved just for fall.
Ingredients:
* 1 1/4 cups flour
* 2 Tbsp. sugar
* 2 tsp. baking powder
* 1/2 tsp. cinnamon
* 1/2 tsp. salt
* 1/2 tsp. ginger
* 1/8 tsp. nutmeg
* 1 pinch cloves (optional)
* 1 cup milk
* 6 Tbsp. canned pumpkin puree
* 2 Tbsp. melted butter
* 1 egg
* butter & syrup for serving
Directions:
1. In a mixing bowl, combine first 8 ingredients - flour through cloves.
2. In another mixing bowl, whisk together milk, pumpkin, melted butter & egg.
3. Pour wet ingredients into dry ingredients & mix until just combined.
4. Grease & preheat your griddle or skillet to 350 or medium-high.
5. Pour 1/4 cup batter onto the griddle for each pancake.
6. Pancakes are ready to flip when they are bubbly on top.
7. Flip & cook until pancakes are cooked through (about another 3 minutes).
8. Serve with butter & maple syrup.
Yield: 14-16 pancakes
My Tid-Bits:
* These pancakes are very dense & filling! If you're making these for a crowd, allow 3 - 4 pancakes per person. This recipe can easily be doubled.
* If I have leftover pancakes, I put them in a Ziploc bag, remove the air & toss them in the freezer. They are easy to reheat for a yummy breakfast during the week.
* Warm cinnamon apples make a great side dish to go with these pancakes.
* Each pancake has about 65 calories and 2g fat. We won't count the calories in the butter & syrup.
.
Thursday, March 18, 2010
Dinner On A Stick
Last weekend, The Hubs & I made a quick trip to our lake house for some much needed get-away-from-the-city time. We would spend all of our time there if it wasn't for those pesky little things called jobs (which are needed to even have the lake house). The weather was perfect! We got in a long boat ride & even caught some fish. See...
It must be written in the Man Code somewhere that "If you are at/near the lake, you must grill." The Hubs insists that we cook out every time we are there. Which in all honesty is fine by me because instead of hovering in the kitchen while we womenfolk try to fix dinner, the men all stand outside around the grill with cold beverages & talk about...well, I'm not really sure what they talk about.
(Side note: I don't know what men talk about because every time The Hubs talks to one of his friends, he & I have the following conversation:
Me: What did ______ have to say?
The Hubs: Oh, not much.
Me: But you talked to him for an hour. How is _______ (wife/girlfriend)?
The Hubs: I don't know. She didn't come up in our conversation.
You'd better believe that if I just talked to my friend for an hour & he asked me what my friend & I talked about, he'd get all kinds of details about her, her family, her job, her significant other, etc. that he didn't even want to know. I guess that's just the difference in men & women.)
Anyway...where was I? Oh, yes...grilling.
We typically grill steaks or burgers and occasionally fish, but this time I decided to do something a bit different. I decided we'd have "Dinner On A Stick" aka Kabobs.
Dinner On A Stick is SUPER easy. All you need is this:
Some of these...
And the whatever meat & veggies you'd like to put on your skewers. I'd recommend any of the following:
Chicken Breast
Steak
Shrimp
Bell Pepper
Onion
Cherry Tomatoes
Zucchini
Squash
Mushrooms
Carrots
Eggplant
Directions:
1. Cut all ingredients into bite sized pieces.
2. Put all ingredients in a bowl. Pour Italian Dressing over the top. Toss to coat.
3. Cover & put in the refrigerator to marinate for at least 2 hours, occasionally stirring.
4. While the meat & veggies are marinating, soak wooden skewers in water so they don't burn on the grill. Sharp, flaming stick can be dangerous.
5. When you're ready to make dinner, preheat the grill and start your Dinner On A Stick assembly. Slide the ingredients onto the skewers, alternating meat & veggies.
6. Be sure not to squish the ingredients too close together on the skewer or they won't cook evenly.
7. Grill for 4-5 minutes; Turn and grill 4 minutes more or until meat is cooked through.
I love this meal because it really is a meal unto itself. You've got your meat & your veggies all in one! All you need is a salad, some bread & dessert and you're good to go!
My Tid-Bits:
* For the steak, I used one of those bacon wrapped fillets because its what I had on hand. I just removed the bacon & chopped the steak into bite sized pieces. You can also buy pre-cut kabob beef at the grocery.
* If you want to use shrimp, I'd recommend you put them on their own skewer because they will cook much faster than everything else (about 1.5 minutes per side).
* These are great for informal events where people are nibbling while visiting with other guests. However, if you plan to serve these at such an event, I highly recommend you use the short 4" skewers rather than the long ones. They are much less awkward to eat while standing/visiting.
* These are also great for tailgating! We typically cook out before every A&M football game with our dear friends A&S. These are easy to make ahead & throw on the grill before the game.
Here's to many more fun weekends at the lake!
.
Tuesday, March 16, 2010
Central Market - One Of The Hazards Of My Job
Many of you may or may not know that I'm in the food industry. I'm in sales for a company that manufactures & sells things like soups, sauces, hot dogs, BBQ, etc.
I was recently approached by a customer about doing a proprietary line of retail products for their brand of restaurants. (For now they shall remain anonymous, but should this retail line eventually go to market, you'd better believe I will be shouting about it to anyone within listening, or seeing, distance).
Anyway...The first thing we always do when we have a new concept is market research. Today's market research took me to a place more dangerous to my pocket book than Target. I had to go to...
OH SWEET HEAVENS HOW I LOVE CENTRAL MARKET!
I typically try to steer clear of this place because regardless of if I need groceries or not, I'm not walking out of there without having spent $50. Today was no exception. I went in for work research and walked out with (amongst other things)...
Mini Scones
I didn't even make it out of the parking lot before I had opened these little guys up & had one...or two.
Strawberries & a Ginormous Grapefruit
These are probably the best looking strawberries I've seen all season!
A Bottle Of Red Wine
And some Smithwick's Irish Ale - because it was on special today and The Hubs & I recently discovered that we really like it.
But my most favorite find of the day was this section:
The Pre-Made Meal Kit Case!
There was a case full of these pre-made meal kits that you just take home, throw together & serve. Y'all know I love to cook; however, there are some nights I just don't have time. With baseball season right around the corner (yes, I sell hot dogs to professional baseball teams) I am going to be SUPER busy and will be getting home late from the ballpark about 60+ nights between now & September. These little meal kits could be this girls best friend (if only Central Market wasn't on the opposite side of town).
I decided I'd give one of these meal kits a try. There were so many to choose from, it was hard to pick just one. They have all kinds of soups, Italian & Asian dishes, stir fry, etc. I finally decided on Vietnamese Chicken Pho. It's a bit cool & rainy here, so a warm soup sounded ideal. All you do it buy the kits...
And follow the directions on the handy little card that comes with it...
And you have dinner ready to go in under 10 minutes. I must say, these kits are priced very reasonably, as well. This meal was $8.48. Not bad for dinner for 2!
Now if I can just convince my husband that Pho is tasty, I'll be all set for dinner tonight.
.
Wednesday, March 10, 2010
Black Bean & Chicken Enchiladas
This post is by special request of my friend, CPBE!
This Black Bean & Chicken Enchilada recipe has been passed around & shared with friends more times than I could count! It originated in my best friends kitchen while we were in college. We were looking for an enchilada recipe, found one, made some tweaks & the rest is history!
Ingredients:
* 2 cups chicken breasts, cooked and shredded
* 1 package cream cheese
* 1 cup enchilada or taco sauce
* 1 can black beans, drained and rinsed
* Monterey-Jack cheese, shredded
* Tortillas
* Tomatoes (optional)
* Sour Cream (optional)
* Avocado (optional)
Directions:
1. In a sauce pan, combine the cream cheese and enchilada sauce. Heat until cream cheese is melted, stirring often.
2. Reserve 1/2 cup of cream cheese/sauce mixture.
3. Remove from heat. Stir in black beans and chicken.
4. Place a generous spoonful of the enchilada filling onto a tortilla (slightly to one side - not right in the middle).
5. Roll tortilla, starting with the side the filling is on.
6. Place the enchiladas in a lightly greased 13"x9" pan.
7. Top enchiladas with any remaining cream cheese/enchilada sauce mixture.
8. Cover with foil and bake for 30 min. at 350 degrees.
9. Remove foil and sprinkle with cheese. Put back in oven for 5 minutes to melt cheese.
10. Top with sour cream, tomatoes, avocado...whatever you like!
My Tid-Bits:
* Chicken: I usually season & boil 2 chicken breasts for this recipe, but you can use any left over chicken - grilled, roasted, etc.
* Sauce: My first choice is Pace Enchilada Sauce; however, I haven't been able to find it for over a year. I've found that their taco sauce is almost the exact same & works great!
* Tortillas: I've used a variety of sizes & types. Its mostly about personal preference. The smaller the tortilla you use, the more enchiladas you can make.
* This recipe is by no means low calorie, but you can easily control the fat/calories by using fat free cream cheese, low fat sour cream, low fat cheese, etc. It really doesn't affect the flavor much.
Tuesday, March 9, 2010
Fabulous Foods Website Spotlight - Foodzie.com
My sister recently sent me an email about a website she found called Foodzie.com. It's basically like Etsy, but for gourmet food, snacks, gifts, etc.
Straight from their website:
"We are an online marketplace where you can discover and buy food directly from small passionate food producers and growers."
They have pages & pages of tasty looking items. I haven't personally ordered anything from them YET, but when I do, my order may contain:
* Almond Butter Crunch from p.o.p. candy - It's almonds in buttery, crunchy toffee. What's not to love??
* Beef Jerky from Gourmet Jerky for The Hubs (well, for me too).
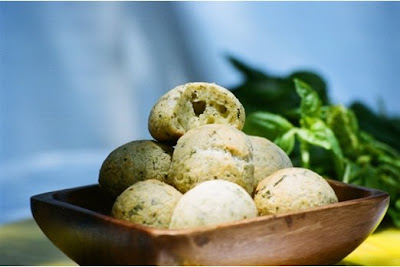
* Basil Cheese Bread from Rio's Brazilian - Bread, Basil, Cheese...enough said!
* These cookies from Whimsy & Spice combine two of my favorite types of cookie - Brown Sugar Gingerspice Shortbread Cookies
* Raspberry Bars from Lisa's Cookie Shop - I love ANYTHING raspberry. Yumm!
Really everything from their whole Bakery section looks delicious!
When I place an order from Foodzie.com, I'll let you know what I get & how it turned out. In the meantime, check them out!
P.S. I've had my first request (and it came all the way from Italy)!! My friend, C requested that I share my Black Bean Chicken Enchiladas on my blog, so I'm off to make them for dinner! Come back tomorrow for the recipe & a play-by-play of my enchilada making skills.
And please feel free to make requests or suggestions for recipes!
.
Subscribe to:
Posts (Atom)